Installing PHP FastCGI and Zend OPcache on WampServer

Why install PHP + FastCGI?
Mod-PHP comes installed with WampServer, and it is slow.
You also cannot utilise the Zend opcode cache, which is included with PHP itself since PHP 5.5.
Steps to install PHP + FastCGI
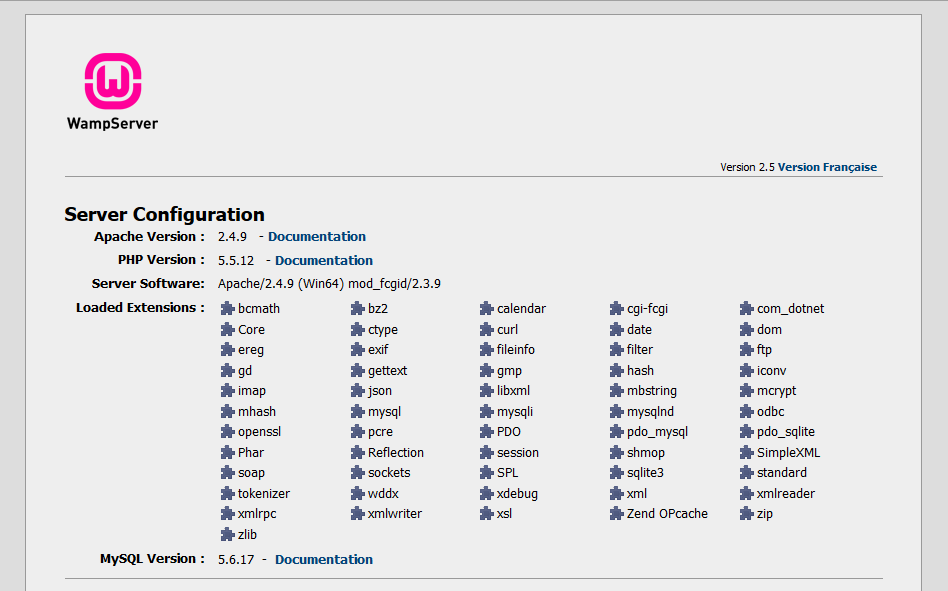
Identify the version of Apache server that is running. Tips: visit http://localhost/ on your browser. The default WampServer homepage will show the details of Apache server. (Example: Server Software: Apache/2.4.9 (Win64) ).
Download mod_fcgid binaries for windows. Extract the files and copy “mod_fcgid.so” into the apache modules folder. The folder path will be
C:\Wamp\bin\apache\apache2.4.9\modulesif your Apache version is 2.4.9.- Apache 2.4-VC11 (64-bit): http://www.apachelounge.com/download/VC11/modules/modules-2.4-win64-VC11.zip
- Apache 2.4-VC11 (32-bit): http://www.apachelounge.com/download/VC11/modules/modules-2.4-win32-VC11.zip
- Apache 2.4-VC10 (64-bit): http://www.apachelounge.com/download/win64/modules-2.4/mod_fcgid-2.3.9-win64.zip
- Apache 2.4-VC10 (32-bit): http://www.apachelounge.com/download/win32/modules-2.4/mod_fcgid-2.3.9-win32.zip
- Apache 2.2-VC10 (64-bit): http://www.apachelounge.com/download/win64/modules-2.2/mod_fcgid-2.3.9-win64.zip
- Apache 2.2-VC10 (32-bit): http://www.apachelounge.com/download/win32/modules-2.2/mod_fcgid-2.3.9-win32.zip
Download the latest PHP binaries for windows. (Link: http://windows.php.net/download/). Choose the non-thread-safe (nts) version for fastcgi usage. (Note for Apache 64-bit: When running over fastcgi, the 32-bit version of PHP works fine with Apache 64-bit and can be used instead of the experimental 64-bit version of PHP). The default PHP installation in WampServer is thread-safe (ts) and will be replaced later. Create a folder (eg:
C:\Wamp\bin\php\php5.5.12-nts) for your new php installation. Extract and copy all the files into the folder.Edit the Apache configuration file. Open the file
C:\Wamp\bin\apache\apache2.4.9\conf\httpd.confin a text editor such as Notepad++.Look for these two lines:
LoadModule php5_module "C:/Wamp/bin/php/php5.5.12/php5apache2_4.dll"
PHPIniDir C:/Wamp/bin/php/php5.5.12
Disable mod_php by replacing them with:
#LoadModule php5_module "C:/Wamp/bin/php/php5.5.12/php5apache2_4.dll"
<IfModule php5_module>
    PHPIniDir C:/Wamp/bin/php/php5.5.12
</IfModule>
Enable mod_fcgid by adding the following line:
LoadModule fcgid_module modules/mod_fcgid.soConfigure mod_fcgid by adding the following lines:
<IfModule fcgid_module>
    FcgidInitialEnv PATH "C:/Wamp/bin/php/php5.5.12-nts;C:/WINDOWS/system32;C:/WINDOWS;C:/WINDOWS/System32/Wbem;"
    FcgidInitialEnv SystemRoot "C:/Windows"
    FcgidInitialEnv SystemDrive "C:"
    FcgidInitialEnv TEMP "C:/Wamp/tmp"
    FcgidInitialEnv TMP "C:/Wamp/tmp"
    FcgidInitialEnv windir "C:/WINDOWS"
    FcgidIOTimeout 64
    FcgidConnectTimeout 16
    FcgidMaxRequestsPerProcess 1000
    FcgidMaxProcesses 3
    FcgidMaxRequestLen 8131072
    # Location php.ini:
    FcgidInitialEnv PHPRC "C:/Wamp/bin/php/php5.5.12-nts"
    FcgidInitialEnv PHP_FCGI_MAX_REQUESTS 1000

    <Files ~ "\.php$">
        Options Indexes FollowSymLinks ExecCGI
        AddHandler fcgid-script .php
        FcgidWrapper "C:/Wamp/bin/php/php5.5.12-nts/php-cgi.exe" .php
    </Files>
</IfModule>
Edit phpmyadmin alias configuration file at
C:\Wamp\alias\phpmyadmin.conf.Locate the following lines:
php_admin_value upload_max_filesize 128M
php_admin_value post_max_size 128M
php_admin_value max_execution_time 360
php_admin_value max_input_time 360
Replace them with these lines:
<IfModule php5_module>
    php_admin_value upload_max_filesize 128M
    php_admin_value post_max_size 128M
    php_admin_value max_execution_time 360
    php_admin_value max_input_time 360
</IfModule>
Create a new php configuration file by copying existing file at
C:\Wamp\bin\php\php5.5.12\php.initoC:\Wamp\bin\php\php5.5.12-nts\php.ini. Similarly, open a text editor to edit the new configuration file.Correct the path for extension_dir:
extension_dir = "C:/Wamp/bin/php/php5.5.12-nts/ext/"Comment out the XDebug extension if it is not required.
;zend_extension = "C:/Wamp/bin/php/php5.5.12/zend_ext/php_xdebug-2.2.5-5.5-vc11-x86_64.dll"Otherwise, download the nts version of the xdebug extension from http://xdebug.org/download.php and place it in the folder
C:/Wamp/bin/php/php5.5.12-nts/zend_ext/. Then, change the path for the XDebug extension.zend_extension = "C:/Wamp/bin/php/php5.5.12-nts/zend_ext/php_xdebug-2.2.5-5.5-vc11-nts.dll"
Finally, restart Apache server and PHP should be running in FastCGI mode. Visit http://localhost/?phpinfo=1 and check that ServerAPI is CGI/FastCGI to confirm.
Steps to Enable Zend OPcache
Edit the php configuration file at
C:\Wamp\bin\php\php5.5.12-nts\php.ini.- Locate the section [opcache].
Add this line before the section:
zend_extension=php_opcache.dllUncomment the configuration lines in the section:
[opcache]
; Determines if Zend OPCache is enabled
opcache.enable=1

; Determines if Zend OPCache is enabled for the CLI version of PHP
opcache.enable_cli=0

; The OPcache shared memory storage size.
opcache.memory_consumption=64

; The amount of memory for interned strings in Mbytes.
opcache.interned_strings_buffer=4

; The maximum number of keys (scripts) in the OPcache hash table.
; Only numbers between 200 and 100000 are allowed.
opcache.max_accelerated_files=2000

; The maximum percentage of "wasted" memory until a restart is scheduled.
opcache.max_wasted_percentage=5

; When this directive is enabled, the OPcache appends the current working
; directory to the script key, thus eliminating possible collisions between
; files with the same name (basename). Disabling the directive improves
; performance, but may break existing applications.
opcache.use_cwd=1

; When disabled, you must reset the OPcache manually or restart the
; webserver for changes to the filesystem to take effect.
opcache.validate_timestamps=1

; How often (in seconds) to check file timestamps for changes to the shared
; memory storage allocation. ("1" means validate once per second, but only
; once per request. "0" means always validate)
opcache.revalidate_freq=2

; Enables or disables file search in include_path optimization
opcache.revalidate_path=0

; If disabled, all PHPDoc comments are dropped from the code to reduce the
; size of the optimized code.
opcache.save_comments=0

; If disabled, PHPDoc comments are not loaded from SHM, so "Doc Comments"
; may be always stored (save_comments=1), but not loaded by applications
; that don't need them anyway.
opcache.load_comments=0

; If enabled, a fast shutdown sequence is used for the accelerated code
opcache.fast_shutdown=1

; Allow file existence override (file_exists, etc.) performance feature.
opcache.enable_file_override=0

; A bitmask, where each bit enables or disables the appropriate OPcache
; passes
opcache.optimization_level=0xffffffff
Finally, restart Apache web server. Visit http://localhost/?phpinfo=1 and search for Opcache. If it is found, then you have successfully enabled opcode caching!
comments powered by Disqus